
An increasing number of artists, even those firmly committed to working in traditional media, are discovering the value of adding digital painting and drawing tools to their repertoire.
The transition can be daunting, though, with some artists feeling intimidated by what they perceive as complex and expensive digital art tools and the implied learning curve.
There are smaller, easier to use alternatives, however, that can make the dive into digital art simpler and require less of an up-front investment.
One of them is ArtRage, a digital painting and drawing application by Ambient Design that represents an inexpensive alternative to the industry standard digital painting and drawing applications like Corel Painter and Adobe Photoshop (I might include Manga Studio Pro as a standard at this point as well).
I received a review version of ArtRage3 Studio Pro, and as someone with both an eye to the needs of novice digital painters and a long personal history of creating digital art in both Painter and Photoshop, I put it through its paces.
Though not strictly necessary, ArtRage is meant, like those other tools, to be used with a pressure sensitive tablet and stylus when drawing and painting. (Wacom’s Bamboo Pen model [more here] allows for basic pressure sensitive pen input for about $70 U.S.)
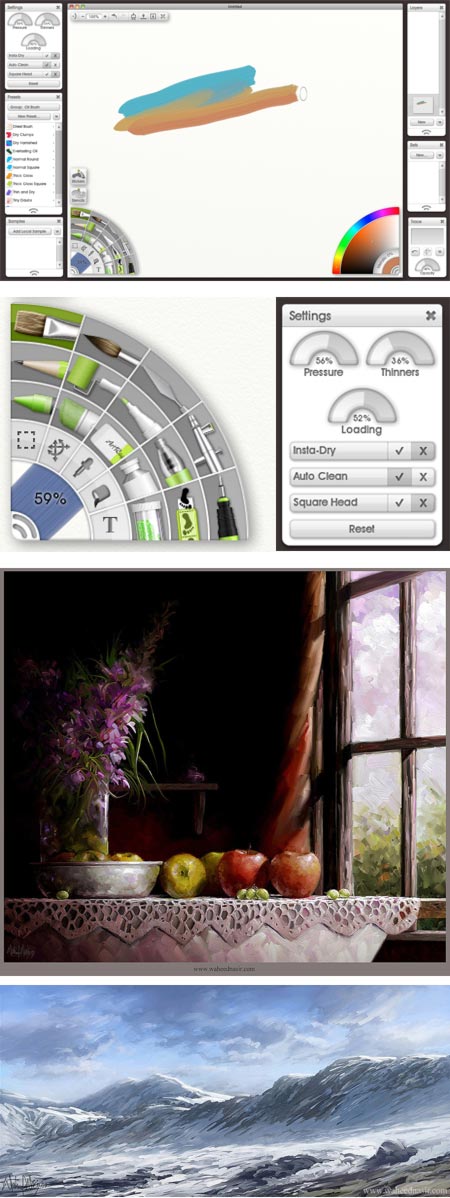
ArtRage features digital emulations of painting and drawing tools for oils, watercolor, pencil, ink, airbrush, chalk and others. The Studio Pro version, which is what I tested, features layers and layer groups, layer blend modes, support for plug-in fliters, importing and exporting custom brush settings and a range of surprisingly sophisticated capabilities for its modest price.
The most direct competition for ArtRage might be AutoDesk’s Sketchbook Pro, though I don’t have a copy of that for comparison. Another relevant application would be Corel Painter Essentials.
Despite a vaguely toy-like interface and inclusion of craft store sillyness like a “Glitter” tool, ArtRage in actual use defies your initial impressions and becomes a surprisingly powerful tool, suitable for creating serious digital artwork.
The application’s strongest point is the drawing and painting tools themselves, particularly the default oil painting brush, which I think is among the best in the industry, and the pen and pencil tools, which are at least as good as the tools from the more expensive counterparts.
Add to that features like layers, layer transparency, layer groups, Photoshop standard blend modes, and the additional capabilities in ArtRage Studio Pro for extra painting tools, selection tools and filters, and you have a very capable digital art tool for a very reasonable price.
The downside, from my point of view, is the quirky and sometimes frustrating interface design, in which the designers have felt it necessary to be clever and original, sometimes at the expense of ease of use.
Many aspects of the interface are clear enough, like the palette of tools and the color picker, and many of the tools are actually easier to use than their counterparts in the more expensive applications, which can sometimes be bewildering to novice users.
However, there are other convention-defying interface design choices that seem different for the sake of being different rather than “different because we think we have a better way to do this”. (I happen to be a fan of the controversial interfaces Kai Krause and Phil Clevenger designed for the mid-90’s Metacreations applications like Bryce and Poser, so I don’t object to non-standard interfaces out of hand).
I initially found it maddening that I couldn’t use some simple UI conventions like “Select All” and “Delete” that are an expected function in any digital graphics application. This frustration was eventually mollified as I began to assign custom key commands (e.g. creating a custom key command for “Clear Layer” as a substitute for Select All and Delete).
The pop-up palettes for things like layers, presets, color swatches and tool settings are fine, even if they waste a bit of screen space on design elements, but I found it mildly annoying that the tool palette and color picker are part of the canvas. They can be hidden easily enough with a key command, and automatically disappear when using a tool in their corners, but cannot be moved or pulled off of the canvas as far as I can tell.
The tool and color palette arrangement is reminiscent of the old versions of Alias Sketchbook (now AutoDesk Sketchbook), but even they have moved to a more conventional tool and color palette arrangement in current versions.
The ArtRage tools themselves, however, once accessed, are a joy to use.
I found them easier to adjust and tweak (certainly for a novice) than comparable tools in Painter and Photoshop; and in general superbly implemented in terms of their action and response.
The pencil tool took much less tweaking on my part to produce a sketchy, light line for preliminary layout, easily adjusted for heavier lines (as if going from a 2h to a 2b in traditional pencil work). The pen tool (interestingly represented in the tool palette by the image of a technical pen instead of a steel quill) is smooth and fluid, with a nice response to pressure sensitivity.
The airbrush behaves well, the camel hair brush and marker tools have the necessary basic settings to make them suitable for speed painting and the creation of digital concept art.
The oil painting brush, in the way it lays down colors over other colors, blends and gives the appearance of blended brush strokes, is terrific. I like it better than any of the default oil brushes in Corel Painter (and I’m a big fan of Painter’s brushes in general), and, like many of the ArtRage tools, it’s just easier to use “out of the box”.
Those who are used to Painter and Photoshop’s more sophisticated brush engines may find some elements of the brush controls limited, but for someone who is just diving into digital art, ArtRage provides a less confusing range of options while allowing a good deal of control and flexibility.
ArtRage Studio Pro is able to import and export a variety of image formats, including (within limitations for some advanced features) layered Photoshop files.
There are a series of tutorials on the ArtRage website to get you started, and there is an ArtRage user community — the webite includes user forums and galleries.
ArtRage Studio Pro is inexpensive (as of this writing, $80 U.S.), and an excellent value given its capabilities. It can be a great place for novice digital artists to start, but is powerful enough for professionals to turn out finished work, as in the two images by Pakistani visual development artist, Waheed Nasir, above.
There are two other versions, both more limited in features, but even less expensive, as you step down: ArtRage 3 Studio (currently $40 U.S.) and Art Rage 2.6 ($20 U.S.). All are available for Mac and Windows. You can upgrade from the lesser versions to the more full featured ones.
There is a brief overview of the versions and features here, and a link at the bottom of the top section of this page to a more complete PDF listing of the differences in features between the versions.
I would certainly recommend that anyone interested in digital art give ArtRage a try, even if you are already comfortable with one of the more expensive tools.
There is a full-featured (but limited export) 30 day demo version of ArtRage 3 Studio Pro available for download.
However, I might suggest downloading their free, limited-feature but unlimited use, ArtRage 2.6 Starter Edition first (link at bottom of this page). This is much more limited than any of the other versions, but you can use it to acquaint yourself with the eccentricities of the interface, and then download and evaluate the full featured but time limited demo of ArtRage Studio Pro; so you don’t waste demo time getting used to the interface.
Even experienced Painter and Photoshop users may find, as I do, that its small memory footprint, quick launch time and sophisticated drawing and painting tools make ArtRage a valuable addition to your digital toolbox.
I continue to work extensively in Painter and Photoshop, but ArtRage has become my favored tool to open up quickly and make sketches or visual notes, and to play with casual digital paintings when I have a few minutes between deadlines.
For those who are looking to make the leap into digital painting, it can be a great place to start.
[Addendum: Cédric Trojani was kind enough to let me know that you can indeed separate the tools and colors palettes from the document area by right-clicking (Windows) or Control-clicking (Mac) on the grabber icon in each corner to access a contextual menu. For more see Cédric’s comments on this post. So the key is really just to familiarize yourself with the ArtRage interface. The more I learn about it, the more flexible and adaptable it becomes.]